May 28, 2013

Electrical Component Preview

One of the last projects standing in the way of turning the key (as well as seeing if all of my wiring was done correctly).


Like my other wiring projects, this one has served as an in-depth lesson in automotive electrical systems. And like everything else with this build, a project as simple as relocating a battery quickly snowballed. It seems to be common practice for batteries to migrate from the stock location (the engine bay in a Saturn S-Series) to the trunk. However, a known water leak made me weary of placing the core of the electrical system back there. With the rear half of the car empty I had plenty of room for an alternate setup. Power will come from an Odyssey PC680 dry cell battery, chosen for its smaller dimensions and positive track record with other Saturn builders. Accompanying the Odyssey are some additional precautionary components (pictured below from left to right):

May 10, 2013

Another Length Of Exhaust

Already done is the next 3' (a little under actually, measuring at 33") of the exhaust system.


I'm going to call this piece the midpipe, the portion of exhaust that includes a flex section and the catalytic convertor. The flex section is a Vibrant item, 6" in overall length with a 3" in diameter and an interlocking liner while the catalytic convertor is a metal core unit, also from Vibrant, with a matching diameter and 10" overall length. To help tuck the exhaust system up under the car, I utilized two 15 degree bends. Everything is 304 stainless steel, of course! The final length of the assembly is entirely random. To keep the catalytic convertor a little closer to the front of the car, I shortened the leg of the bend right before it. The length after the catalytic convertor comes from the longest piece (6.5") of extra tubing I happened to have kicking around. It was an early decision to make this area of the exhaust system its own sub assembly, not only for a less cumbersome solo installation, but to make transport to the welder a little easier for the remaining (and now shorter) exhaust system. The last remaining detail is a hangar to utilize the stock hangar arrangement. I won't be designing that until the rest of the exhaust is ready and I can do all of the hangars in a batch.

May 05, 2013

Oil Catch Can, Welded Up

It took a few trips, but the catch can is all fried up!


I actually fell a few steps back after discovering that my spacing for the internal baffling put the bottom most disc right in the way of the oil drain fitting. This wouldn't had been a big deal, except for making the discovery after having the aluminum nuts tack welded into place. Needless to say, I was at least able to save the perforated discs. Another order with McMaster Carr later, and I had a new and improved version of the baffling - this time I opted to loctite the top nut into place, and eliminate the bottom nut by having the stem of the assembly welded to the base of the catch can. 

May 01, 2013

Downpipe Revisited

Sometime in February I discovered that the downpipe wasn't quite done yet.


Embarrassingly, I had a bit of an oversight with my placement of the oultet v-band flange when I originally fabricated the thing. As I found it, where it ended up next to the oil pan, was too tight to get the v-band clamp on. How I didn't see this the first time I'm not sure, but after a face-palm, some choice words, and removing the wastegate/dump tube assembly the downpipe was back out again. To remedy the problem involved extending the length by 6" to push the flange out into a more open area. Fortunately I had plenty of spare material kicking around, although it meant sacrificing the v-band flange that was on there. The extra length did create another situation however. In the same fashion as a stock Saturn downpipe, I had wanted to add a bracket to secure the exhaust against the two rearward most mounting points of the transaxle-motor brace. Originally I was going to save this additional bracket for the next length of exhaust, but since the downpipe was now passing under these points I would be adding it to the extension.

April 08, 2013

Laser Cut Goods

I thought I'd throw up a quick picture of some laser cut pieces that just got delivered.


Everything was cut out of 11-gauge stainless steel with the exception of the bracket on the upper left, which is 1/8" aluminum. Generally I'll fabricate brackets (such as my oil filter relocation bracket) on my own, but my resources tend to confine me to aluminum (I also don't have a proper way to make bends). Since I was going to be using much harder stainless steel, it made more sense to outsource the work for accuracy and a more finished product. It was also a chance to utilize some of my education - the items pictured started out as cardboard templates that I redrew and refined in AutoCAD. I would like to thank Sixthsphere member coppertop_01 (Jeremy) for providing me with his services. I simply provided him with the drawing and he took care of the rest! As for what each piece is, I'm going to wait to tell as they reappear in future posts.

January 18, 2013

Oil Catch Can Preview

Along with the wastegate dump tube, this is another project that sat on the workbench taped together and waiting for welding, for a good portion of the year.


The first thing you'll probably ask, and this is the first thing my welder questioned - why not just buy one? The answer is that I simply could not find an oil catch can that I liked, and I hunted high and low. However, my persistent searching did expose me to a lot of features I wanted to incorporate, so it wasn't a complete waste of time at least. For all of the variations out there, it was proving annoyingly difficult to find all of said features in one package. Admittedly, on many an occasion, it was little nit-picky details responsible for making me pass on a catch can. We're talking instances where I wanted male AN fittings instead of female (to eliminate the need for an additional fitting between can and hose) or the provided mounting solution (stupid tabbed hose clamps). So, ultimately, I decided it would just be easier to fabricate my own, ensuring it would be tailored to my needs. Plus there is always that little added satisfaction of building it myself.

January 09, 2013

Wastegate, Take 3 (Now With Dump Tube)

After a several month hiatus, I am back with some visible progress. After awhile of picking at projects, I found myself road blocked by welding which I (admittedly) put off for several weeks.


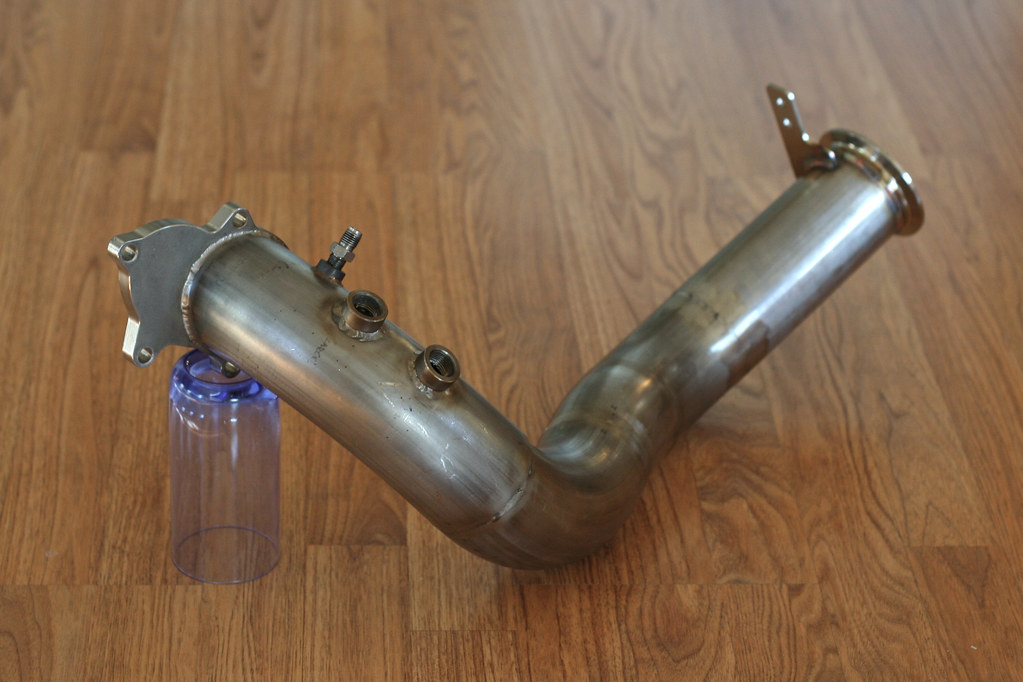
Backing up a bit, in October I had sent out/received my TiAL F38 from a "rebuild". I had had the original wastegate housing powder coated a second time in March, only to experience adhesion issues (chipping) during reassembly. Frustrated, I settled on replacing the housing with one of TiAL's black anodized pieces. This required sending the whole unit in to ensure I wasn't trying to assemble a knock-off. Much to my surprise, the wastegate returned with my damaged housing. Now I have the convenience of a spare should I attempt to powder coat again. One more disassembly was required to clock the housing so the side port was in the right position - hopefully I don't have to take this thing back apart for awhile. Onto the dump tube.