
Along with the wastegate dump tube, this is another project that sat on the workbench taped together and waiting for welding, for a good portion of the year.
The first thing you'll probably ask, and this is the first thing my welder questioned - why not just buy one? The answer is that I simply could not find an oil catch can that I liked, and I hunted high and low. However, my persistent searching did expose me to a lot of features I wanted to incorporate, so it wasn't a complete waste of time at least. For all of the variations out there, it was proving annoyingly difficult to find all of said features in one package. Admittedly, on many an occasion, it was little nit-picky details responsible for making me pass on a catch can. We're talking instances where I wanted male AN fittings instead of female (to eliminate the need for an additional fitting between can and hose) or the provided mounting solution (stupid tabbed hose clamps). So, ultimately, I decided it would just be easier to fabricate my own, ensuring it would be tailored to my needs. Plus there is always that little added satisfaction of building it myself.
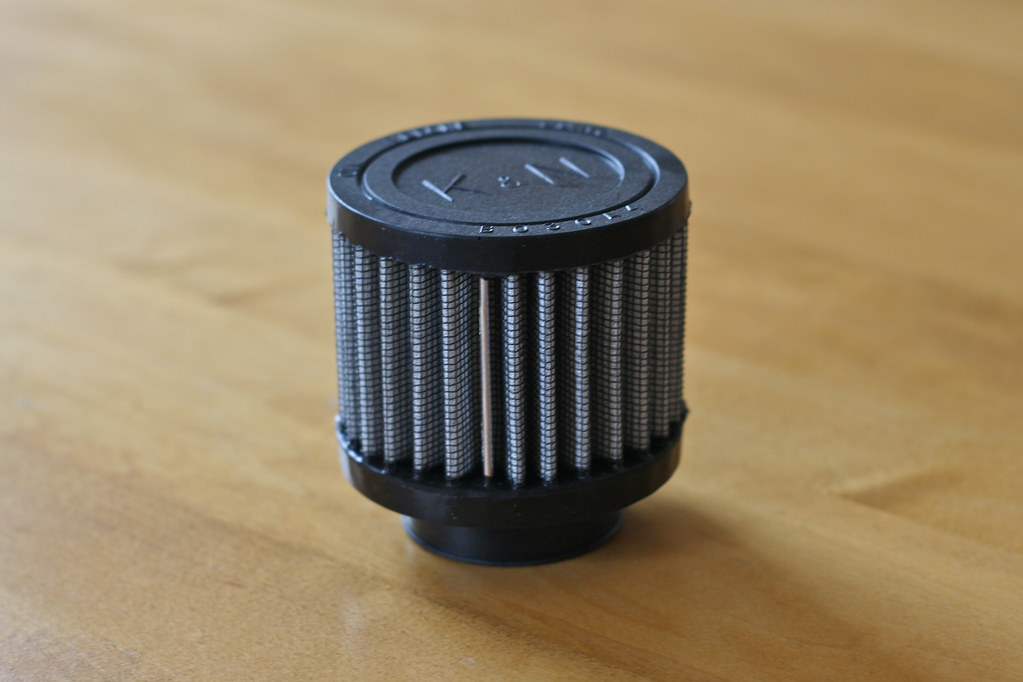
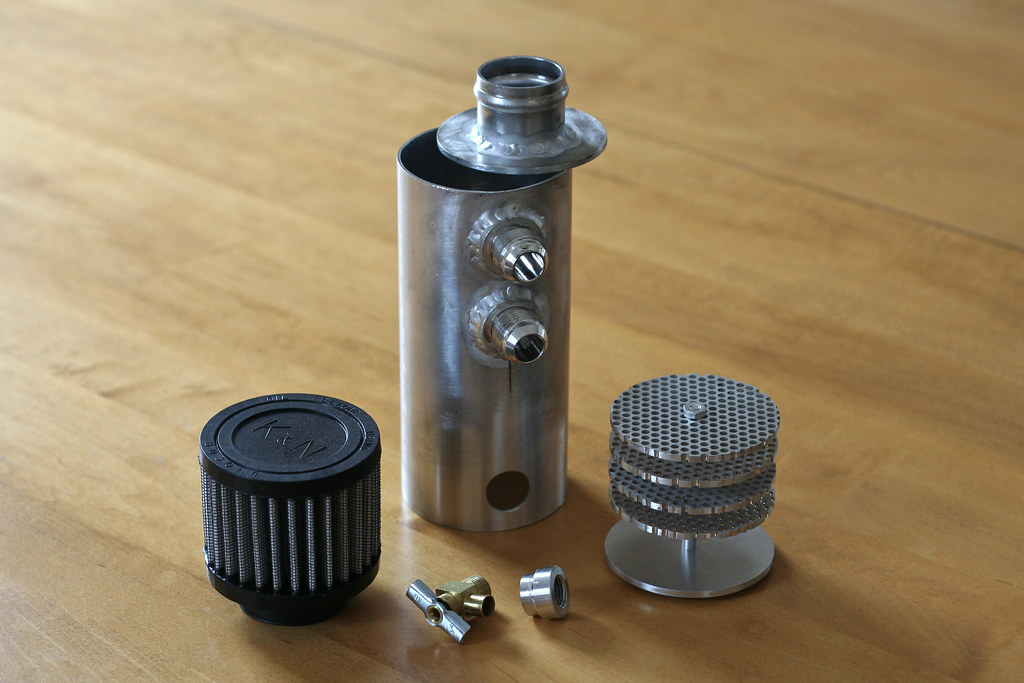
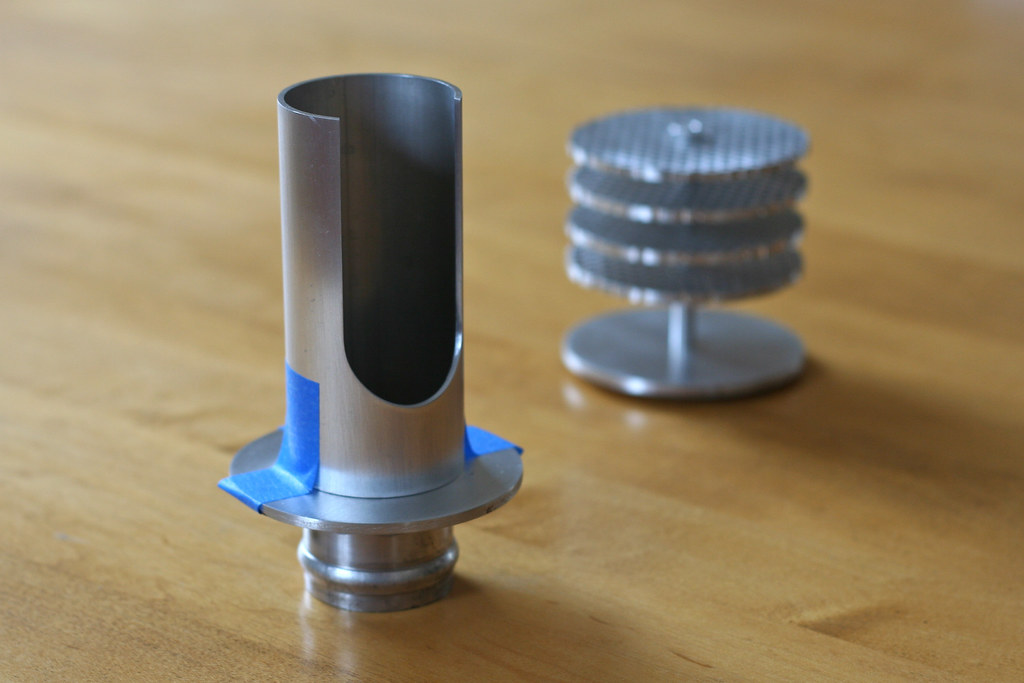
My design all started out of a desired approximate volume of 1 quart, while available (or lack of) under hood space dictated the final 3" x 6.5" dimensions of the body. Aluminum construction saves a little weight, and is also a much easier material for me to work with (cleanly cutting up stainless steel tubing takes an eternity with a hacksaw). Starting at the top, I wanted the catch can to be vented. Some time digging around K&N yielded me a 3" x 2.5" crankcase vent filter with a 1.5" neck and rubber for both the top and base (I'm not a huge fan of the small filters with "chrome" tops). To mount the filter, I sourced a 1.5" bead rolled intercooler coupler that I cut down to 1.25", or just enough to seat the neck of the filter on. For the top cap I specifically ordered a 3-1/8" Morse hole saw (the ID of which being just shy of 3") to cut a disc out of 1/8" aluminum, with a 1.5" hole added to fit the bead rolled piece. The body started as a piece of 16-gauge 3" diameter tubing. After cutting it down to the desired length, I laid out the vertical center to add holes for two -10AN fittings, and later the hole for a 1/4" NPT weld bung to mount a 90 degree drain valve. The weld bung actually ended up being the second of two that I had my Dad modify on his work lathe. A .75" step was machined into the mating surface to seat the piece into the catch can body (the first time around I had the step machined to a diameter that was too small), and the threads were tapped deeper to allow the drain valve to screw in further.

During my hunt for the ideal preexisting catch can, I saw different solutions for internal baffling. A lot of the time people/companies were simply stuffing steel wool inside the body. While this generally does the job, it seems like a sloppy solution, plus there were a few reports of the wool breaking down, making messes, and clogging drain valves. My approach is an interpretation of the more permanent solution found in 42 Draft Designs Stealth Catch Can, which uses a series of spaced perforated discs as a filter media. A friend of mine machined the discs out of a piece of provided 1/8" aluminum perforated with 1/8" holes on a 3/16" stagger. I also had him machine me the blank for the bottom with a .19" hole in the center (the arbor for the hole saw I used in cutting the top disc wouldn't accept a small enough drill bit) for assembly purposes, the idea here being able to pre-assemble the unit for welding.
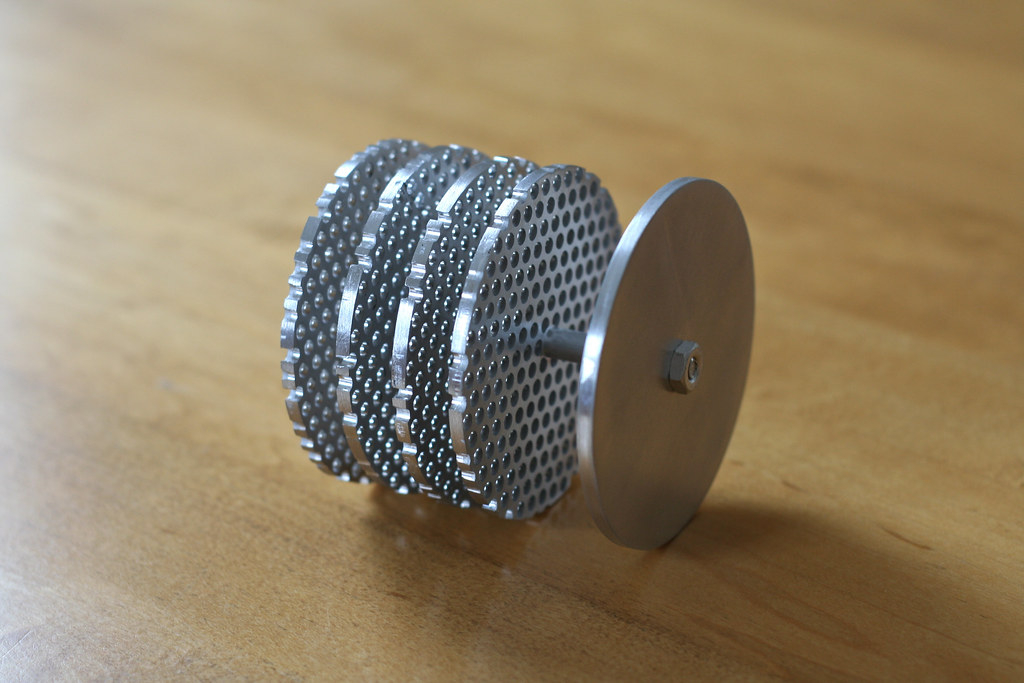
To do so I found an assortment of aluminum hardware from McMaster-Carr. At the center of the assembly is a 3" long fully threaded 10-32 rod. A 1" long, 1/4" OD threaded standoff offsets the bottom-most disc from the bottom, while three 3/8" long, 1/4" OD threaded standoffs space the four discs from each other. Two aluminum 10-32 nuts on each end secure the filter assembly together for ease of transport to the welder to be TIG welded into place (hence the use of aluminum hardware). Additionally, I created a baffle out of 16-gauge 1.75" tubing, to separate the ventilation filter from the incoming flow through the AN fittings. This piece is 3.75" in length with a 1.25" wide window positioned opposite of the AN fittings.
Fabrication has been modular in style - bits and pieces getting assembled, driven out to get welded up, and then brought home. All of the running back and forth gives me a foundation to expand on the catch can's construction (you can only tape so many of these pieces together). At least one more trip is planned to have the internal pieces (and some other projects) welded up. Then it'll be back to the house for final dry assembly, before it goes back to the welder to get sealed up (of course). Still left to decide on is a mounting solution.
During my hunt for the ideal preexisting catch can, I saw different solutions for internal baffling. A lot of the time people/companies were simply stuffing steel wool inside the body. While this generally does the job, it seems like a sloppy solution, plus there were a few reports of the wool breaking down, making messes, and clogging drain valves. My approach is an interpretation of the more permanent solution found in 42 Draft Designs Stealth Catch Can, which uses a series of spaced perforated discs as a filter media. A friend of mine machined the discs out of a piece of provided 1/8" aluminum perforated with 1/8" holes on a 3/16" stagger. I also had him machine me the blank for the bottom with a .19" hole in the center (the arbor for the hole saw I used in cutting the top disc wouldn't accept a small enough drill bit) for assembly purposes, the idea here being able to pre-assemble the unit for welding.
During my research into catch cans and oil separators (I used these on my diesels since they put out way more), the stainless steel wool actually works better. They have more surface area and create more turbulence in the air flow, while also being dirt cheap. The issues that people generally tend to have with the steel wool pads, is that they aren't using stainless steel. The stainless won't "break down" over time, unlike the cheaply available ones found in the grocery stores which aren't stainless.
ReplyDeleteWhen you're staying in a new city, you want to be right in amongst the action. With all of its shopping, nightlife, restaurants and attractions based in the CBD oil for sale you know where you want to be during your stay in Adelaide. You won't have to worry about travelling in from the outer suburbs or spending an outrageous amount on transport - book an Adelaide hotel in the CBD as your accommodation option during your visit.
ReplyDelete