

As of this writing the turbo build consists of (or will consist of) the following:
- Turbocharger: Garrett T3 "Super 60" (C 60 Trim/.42 AR, T 68 Trim/.48 AR)
- Turbo Manifold: Custom Alpha Tuning (1.5" Runners, 4-1 Collector, T3 Flange)
- Wastegate: TiAL 38mm (.5 Bar/7.2 psi Spring)
- Downpipe: Custom (Stainless Steel, 3", V-Band Connections)
- Catalytic Converter: Magnaflow Spun (Stainless Steel 3", 4" Daimeter, 9.75" Length)
- Induction Filter: AEM Dryflow (3" Inlet, 8" Length)
- Intercooler: Treadstone TR8 (7.8" x 22" x 3.5")
- Intercooler Plumbing: Custom (Stainless Steel, 2" Hot/2.5" Cold)
- Blow Off Valve: HKS SSQV
- Throttle Body: Geo Storm DOHC (Taper Bored, 66mm/56mm TP)
- Intake Manifold: Saturn DOHC (Ported '94 w/Aluminum Fuel Rail)
- Intake Manifold Gasket: SDA Phenolic Spacer (.25" Thickness)
- Fuel Injectors: Siemens (55 lb/hr)
- Fuel Pump: Walbro 255 LPH (80 psi, 50 Gallons/hr)
- Fuel Management: Megasquirt 2 (V 3.0)
- Spark Plugs: 4x NGK V-Power
- Spark Plug Wires: MSD 8.5mm
- Ignition Coils: MSD GM 2-Tower
- Ignition Management: Megasquirt 2 (V 3.0, Stock Timing)
- Radiator: AMR Engineering (All Aluminum)
- Ratiator Fan(s): 2x Proform (1000 cfm)
- Clutch: ACT 6-Puck
- Flywheel: Fidanza Lightened (Aluminum, 7 lbs)
- Power Steering Delete: OEM SL Ribbed Idler w/Goodyear Gatorback Belt
- EGR Block-Off: Custombilletworks TBI Block-Off Plate
Turbo Build Introduction, November 19th, 2007: "For ages I've wanted to go bigger and better (who doesn't though) and I've gone through many phases. First was the turbo route; QkSL2 inspired when my Dad stumbled upon (and exposed me to) Ian's website way back in the day. I was hooked! Then came the forums. A breif stay at SaturnFans, that turned me over to TSN, fueled ideas for both a high-compression motor and a supercharged build, but I kept comeing back to snail. I even went through a hard and complicated Ecotec swap phase which was comeing pretty close to fruition, but simplicity won me over (and I'm sure all of the New England guys are releived). Although an Ecotec into an S-Series would have been really damn cool and unique the amount of custom fabrication involved slowly turned me off from the idea. I became content with the idea of a simple, basic, but potent turbo LLO once more. Somewhere in there was also some unusual Saturn loyalty garb. Some freshening up is overdue as the exisiting drivetrain has 210k to date and (although it is dead nuts reliable still) it is starting to burn lots of oil and exempt the feeling of fatigue. With such a good suspension under the car now the drivetrain needs to be brought to speed. I just didn't expect to get started so soon. Jeff provoked things when he threw up the old SMS manifold in the classified section for such a steal that I had to jump on it. And today it showed up! It isn't a bad piece; tubular, stainless, but it'll need a lil work.
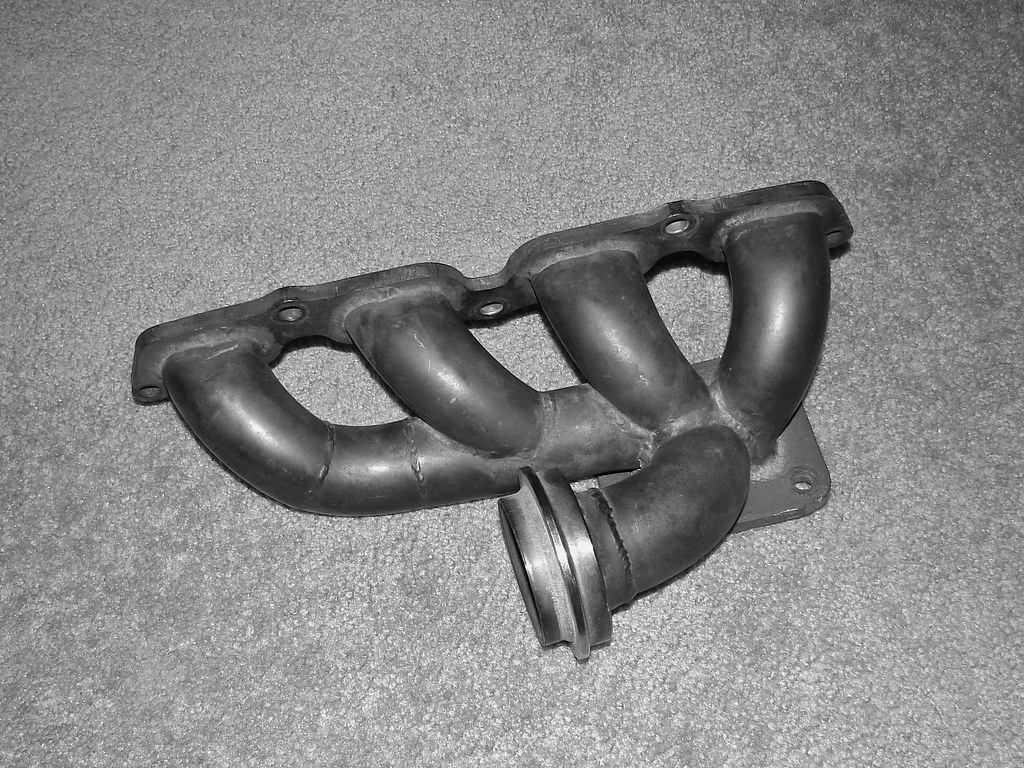
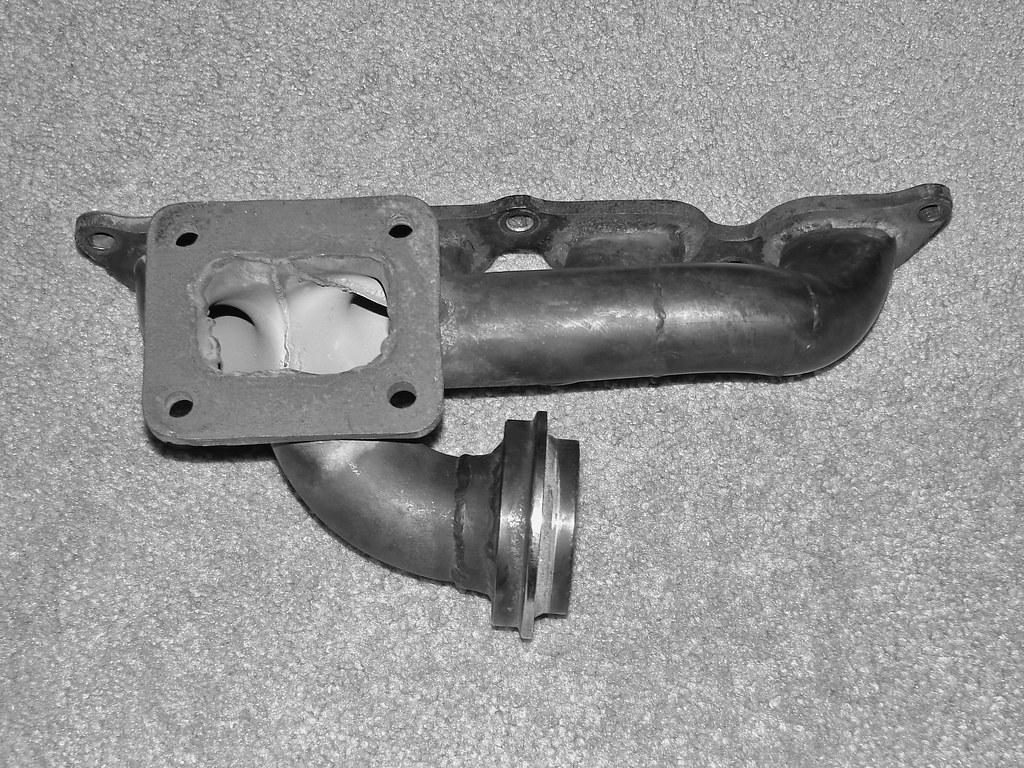
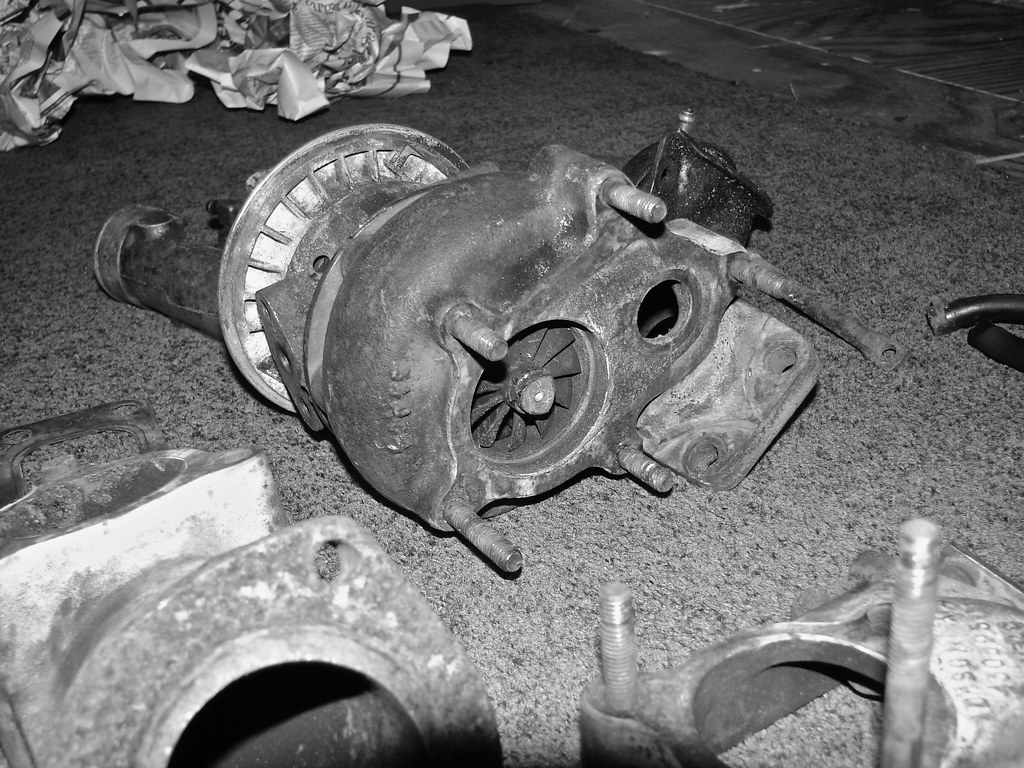
My car won't see either a T4 size turbocharger or a 50 mm wastegate. On top of which the inside of the collector is kind of gunky and there are a few cracked welds. I just hope I don't upset Saturn performance history buff's in the process. The pictured turbocharger I've had for ages. It is an old Garrett T3 that Dad and I picked off of an old Saab 900 at a local salvage yard early in my Saturn career. It is fairly small; internally wastegated to 7 psi, 40 trim, with a compressor A/R of .42, and a turbine A/R of .48. It is also very dirty and seized. Its current state of being is a result of high school automotives class (where I discovered Tyler (sl2fast was one of us). What you see in the pictures is as far as I got with it. This winter, if things go well, I'm going to send it out to http://www.blaastperformance.com for a proffessional rebuild. As for the rest of the set up though, I'll be sticking to the essentials and upgrading only whatever OEM parts aren't up to task. Namely spark plugs, injectors, the fuel pump. It'll be a low boost set up, taking advantage of the stock 7 psi setting, and run by a Megasquirt standalone. The current drivetrain will get a good once over to freshen it up and make it more up to task, nothing fancy though. I must admit that my list of parts on paper has gotten out of hand so many upgrades will probably follow quickly!"

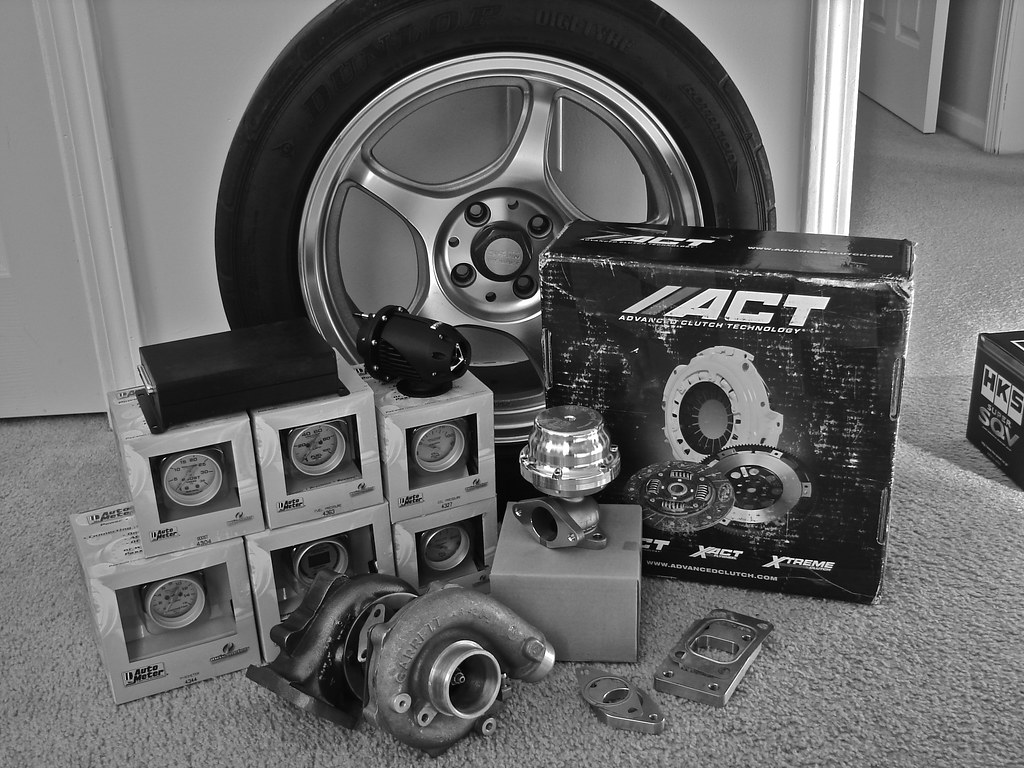
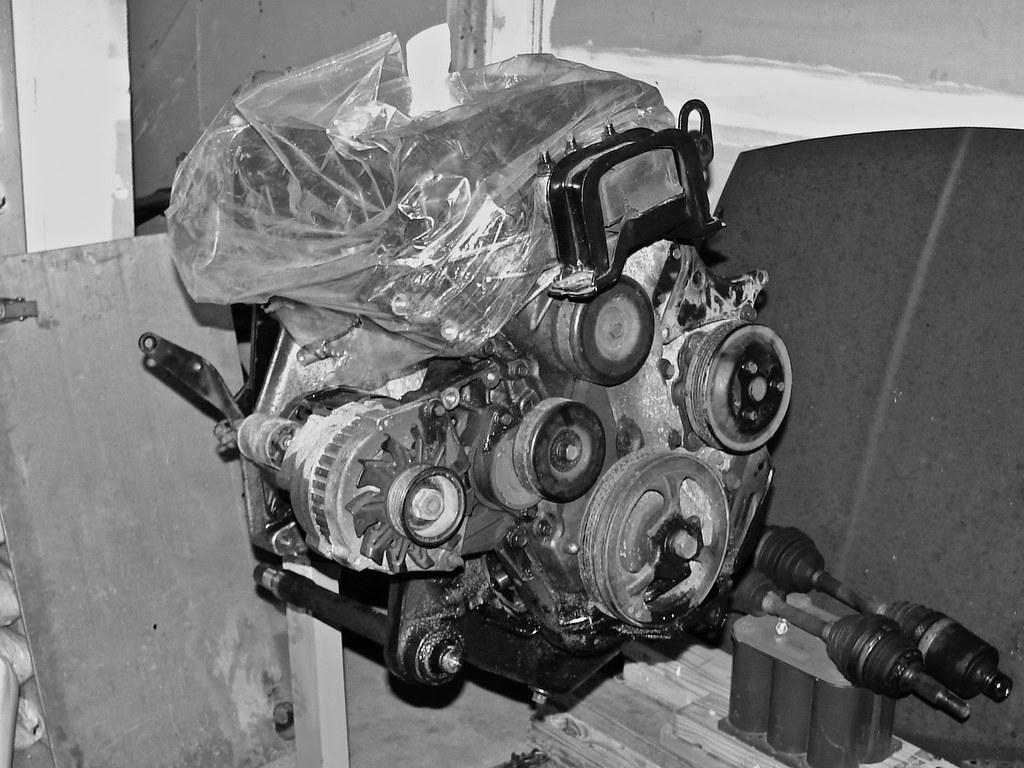
Turbo Build Update, January 24th, 2009: "Simplicity has failed. The SL2 has been dormant for a long ass time now, but she isn't dead. Since my last update on this build I've gone through a POS 93' SL2 (pending STC NE project car) and since aquired sl2fast's 96' SC2. And in the process of upgrading/refineing the coupe the SL2 has been raped of it's CFM2 Short Throw Shifter, OBX Header, and Thermal exhaust. But all for the sake of upgrades! I've been quietly blowing money all winter long collecting the parts to hopefully have this thing boosted before ToTD 09' (?). Pictured are a Garrett T3 "Super 60" (rebuilt and upgraded by Blaast Performance), HKS Limited Black SSQV, Tial 38 mm Wastegate, ACT 6-Puck Clutch, Megasquirt II (harness not pictured), Autometer 2 1/16 Ultra-Lite Gauges (Boost Press, Fuel Press, Oil Press, Pyrometer, WBO2, and Oil Temp), and a few misc. stainless steel flanges (going with a one-off manifold). In the back is a sample of the new rollers; AdamKob32's former set up. Right now the 225/50/16 Potenza's are still mounted, though I plan to step down to a 215/45/16 Azeni. Some items not pictured include a non-AC ribbed idler pulley, pimped TAM, and SDA mounts. I've still got a lot of gathering to go through but I am getting there. Winter temperatures have prevented me from doing anything with the actual car. Once it warms up a bit I plan to start prepping the motor to get pulled. More on that later!"
Turbo Manifold Teaser, October 8th, 2009: "No the project is not dead! Contrary to what the New England guys might think I have been quite busy (haha). Consider this an update teaser. The following is courtesy of Mike from Alpha Tuning. Keep an eye out for the results of my summer long Intake Manifold project. Soon to follow: pulling and detailing the motor."
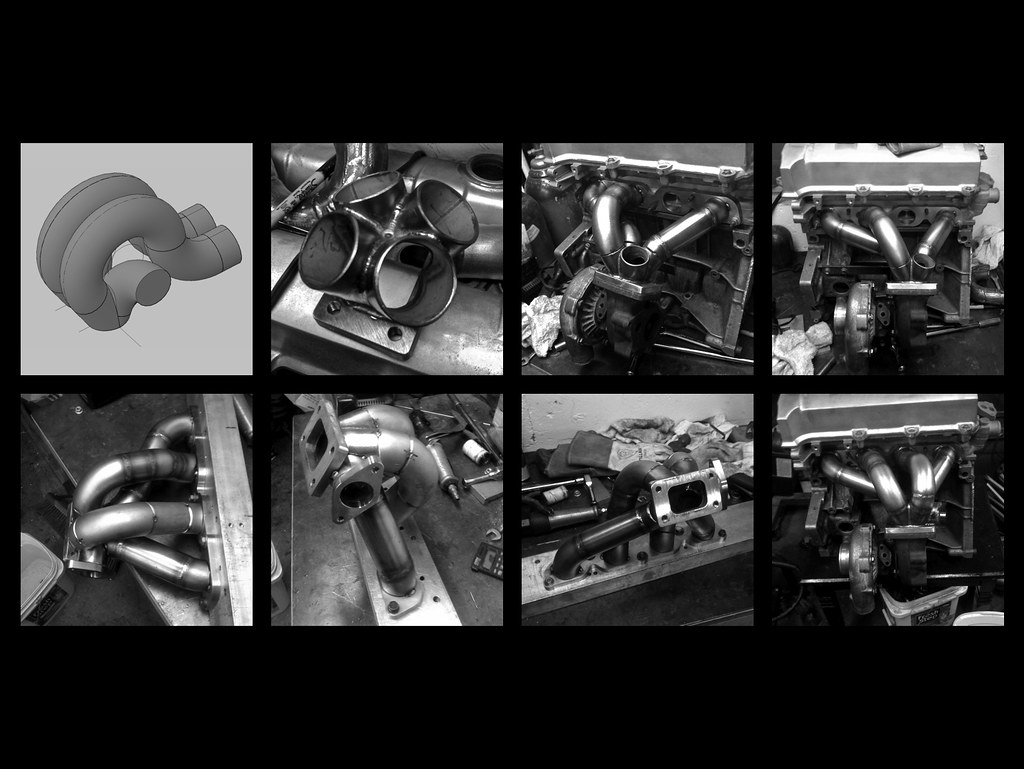
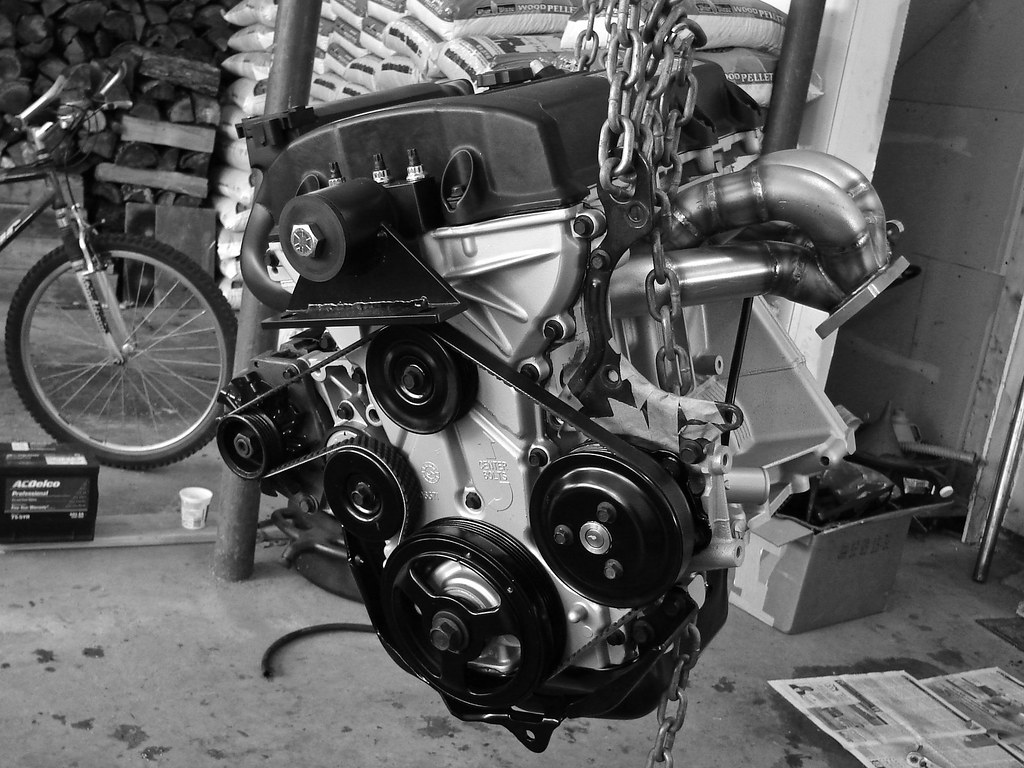
Turbo Build Update, January 12th, 2010: "Since I was so lazy up updating I am now backed up with an ass load of pictures. I'll start the update back when I finally got the motor out of the car. This being my first motor pull made yanking it out a hassle BUT with plenty of lessons (in the form of headaches). I had spent time preparing for the occasion pulling brackets and things (or rounding up replacements) off the drivetrain and refinishing them. A lot of which I viewed as "temporary", meaning I was only reusing them for build one (ex: supporting brackets for the Intake Manifold) so I settled to refinishing these items myself.
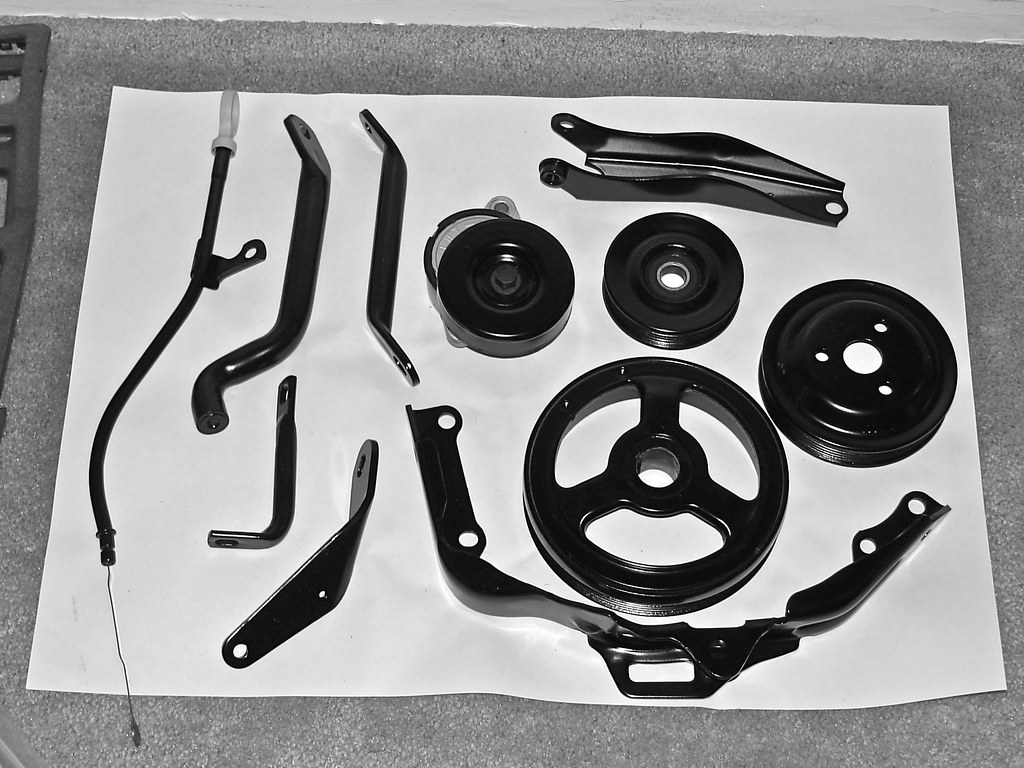

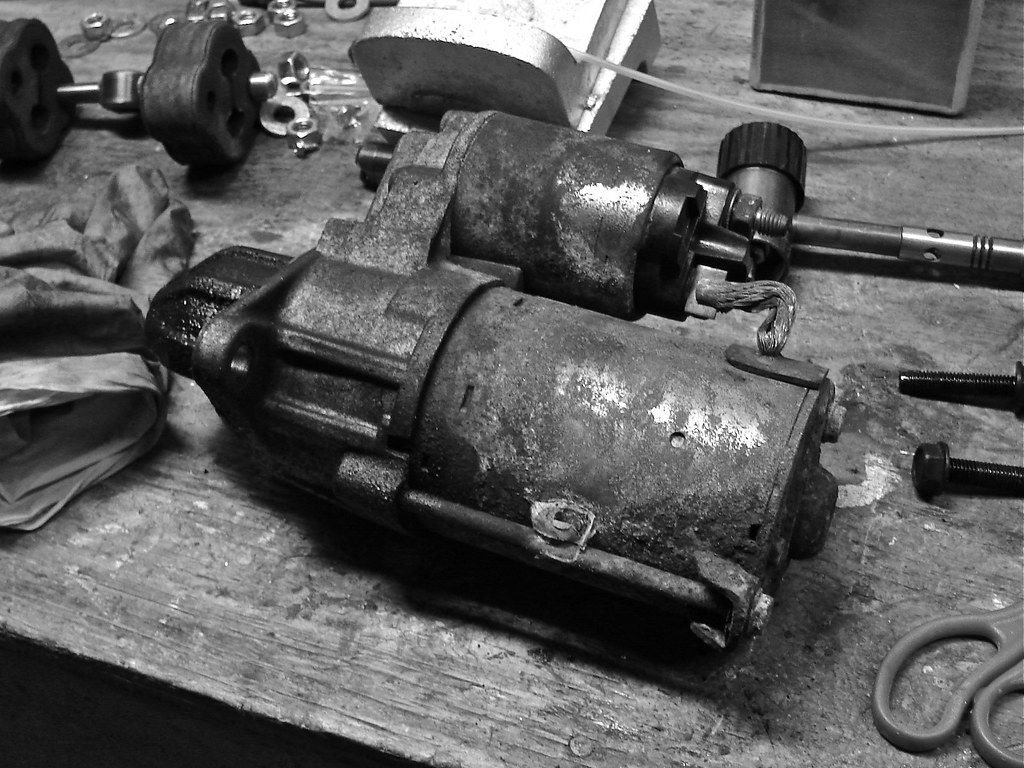
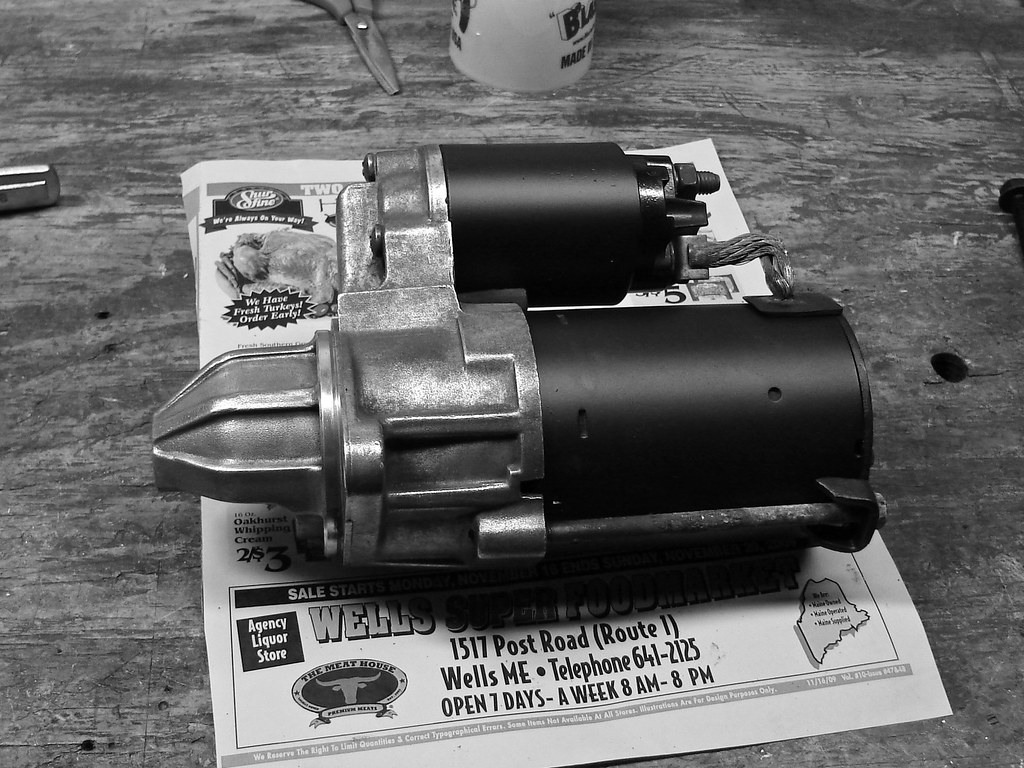
Exceptions were my new motor/trans mounts which I had powdercoated in a flat black, a major player in my desired color scheme set off by my black-edition HKS BOV. Other items that ended up flat black are the intake manifold and EGR block-off. With the drivetrain out I went to town stripping the motor of accessories and degreasing/masking so I could refresh its appearance with a coat of Eastwood Detail Silver (the transaxle later got the same treatment) and redo the TCC gasket. My time was occupied getting tedious over stupid things (hand cleaning hardware before reinstallation) and over the next few months I reinstalled refurbished OEM (starter, alternator, brackets, pulleys) parts as well as upgrades (3G lower tie-plate, oil pick-up, and oil pan).

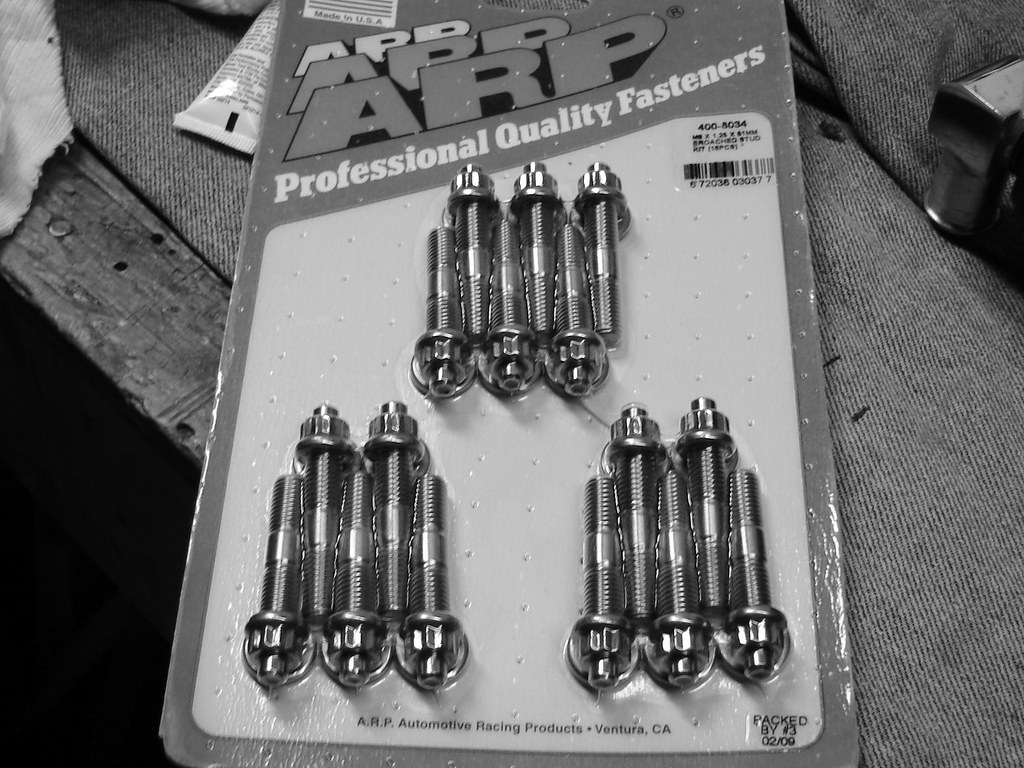
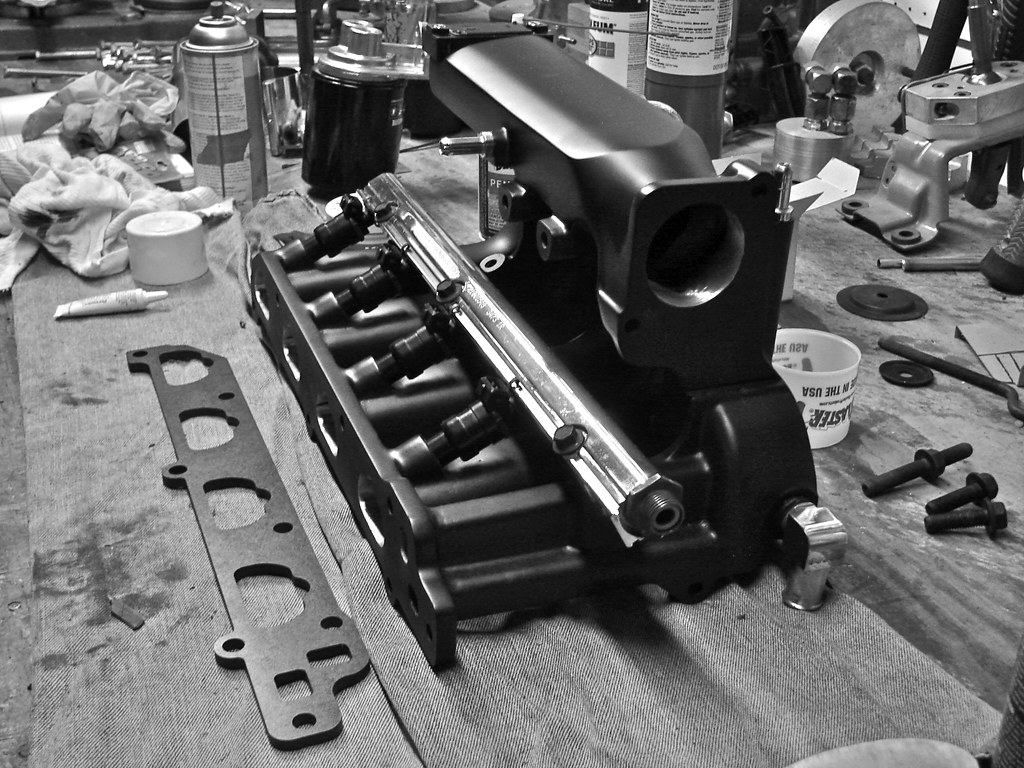
My PITA intake manifold became a summer long labor after getting obsessed with going beyond a port & polish to shaving the exterior. I followed through at the cost of a TON of time. As mentioned I finished it in a matching flat black with brass fittings (two custom machined fittings and a 90* Moroso fitting) hand finished and polished. A shout-out to Bill for the awesome machine work. Before reinstallation I replaced the intake/exhaust studs with ARP goodies.

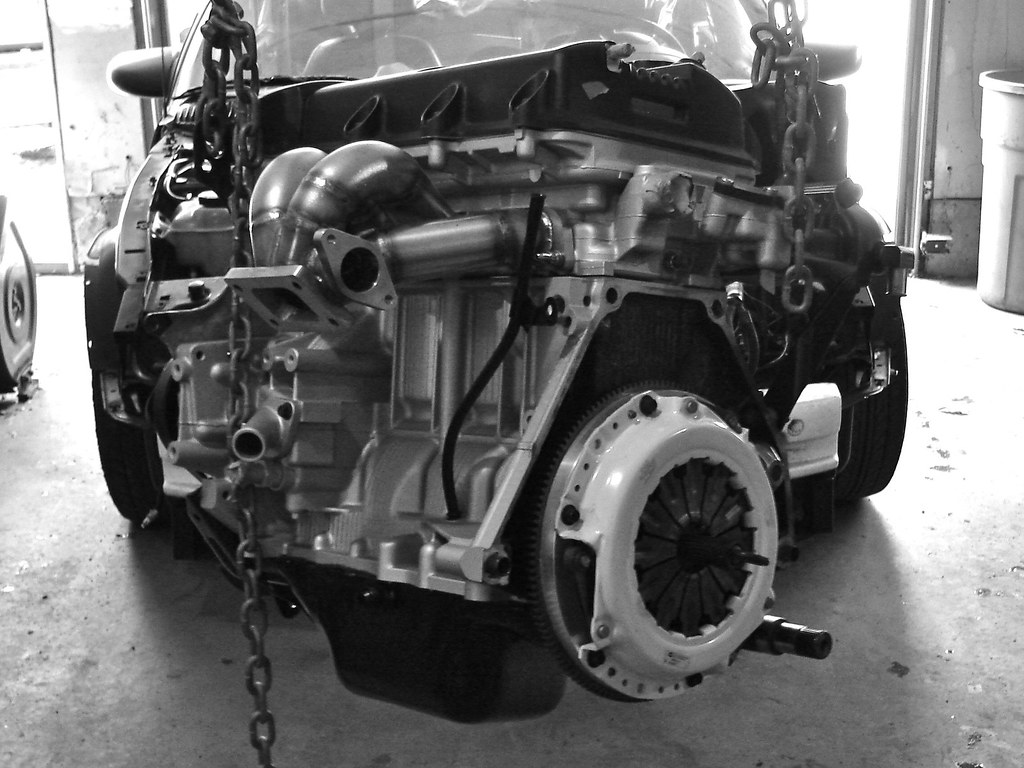
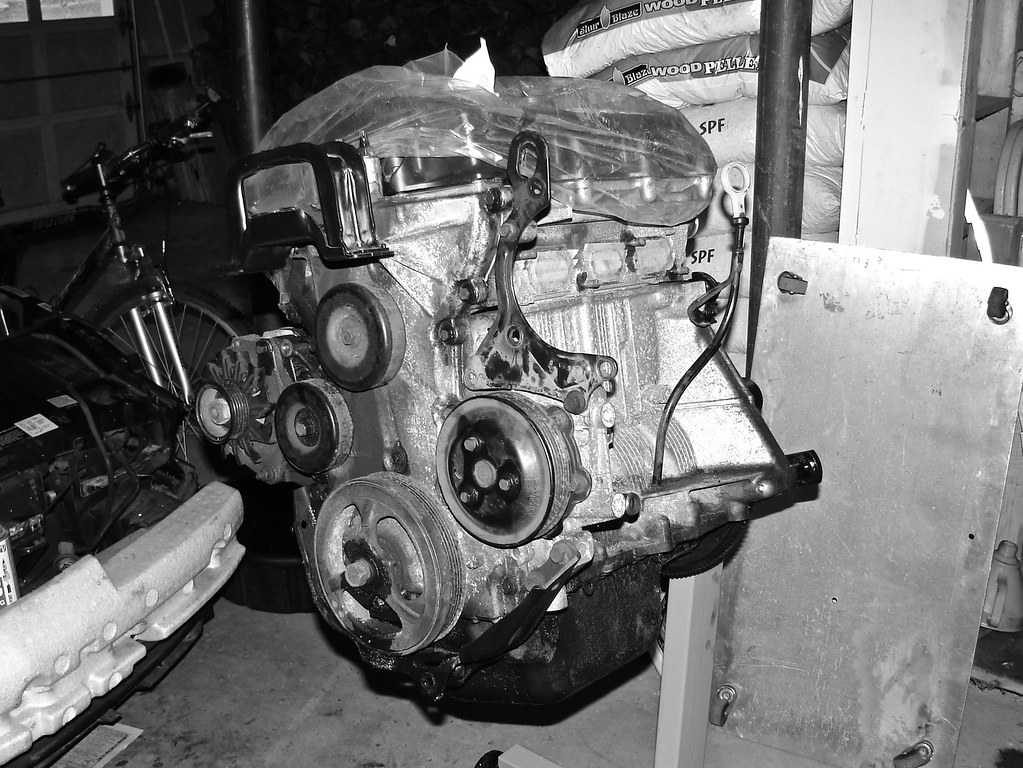
With the motor out I took the opportunity to detail the engine bay, eliminate evap junk, loop the power steering lines, and remove the front crossmember (though I have do some finish work so it doesn't look like a complete hack job). Finally, catching up to the present, the motor is back in as of the weekend before last with a Fidanza Flywheel/ACT Clutch. I had to wrestle with the Pimped TAM/LTM to get the drivetrain settled and my SDA mounts are on stand-by until I can come up with better sleeves for the bushings. Over the past week or so I've been taking my time hooking everything back up and doing more detail work (had to notch the coolant overflow reservoir to clear the bolt in the TAM). I even hung my exhaust manifold (temporarily) for grins."
Additional comparison shots:


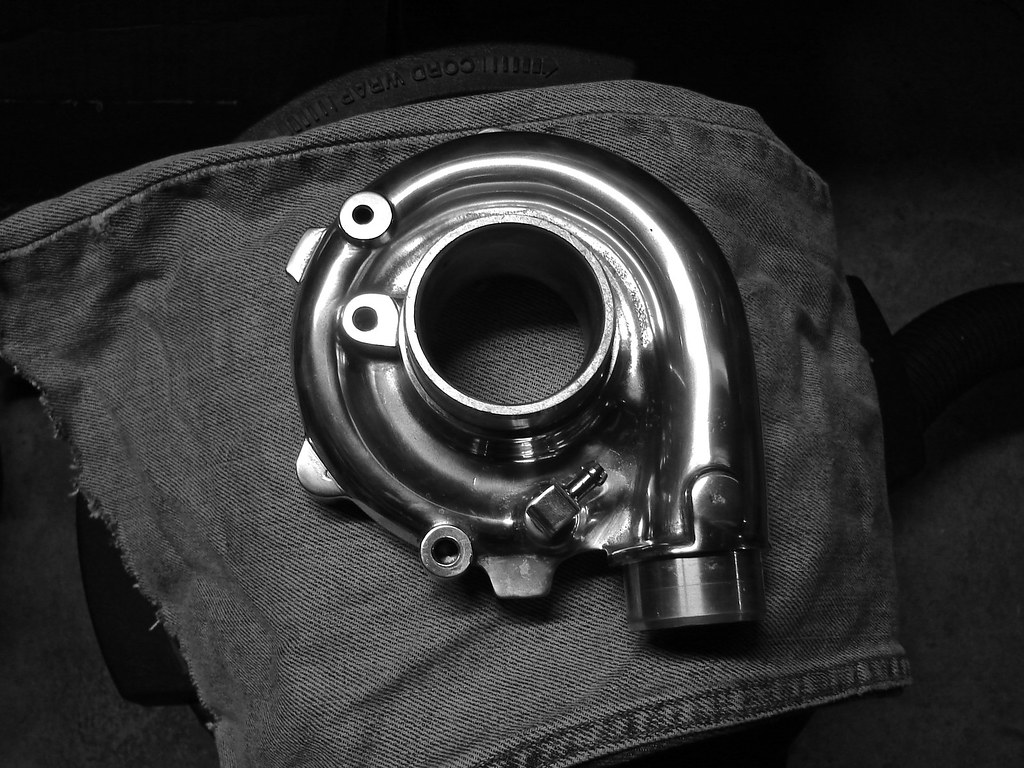
Polished Compressor, February 24th, 2010: "I couldn't install a turbocharger without detailing it so I polished the compressor housing! Not exactly a significant step in progress but rather another taste of detail. I think it came out okay. There was some stubborn pitting in the really tight spots and some of the nooks aren't perfect. I guess I'll live though. My next major endeavor is wiring up the MS2, which I've been stressing about while sweating over wiring schematics, old threads, and the "MegaManual" (http://www.megamanual.com/index.html). I noticed adapter harnesses becoming popular (all of two of them haha) but I'm not sure if I'll go that route. The dash is all blow apart both to get to the PCM and so I could make some alterations to the sub-dash. But more on that later!"

MS2 Mounting, March 17th, 2010: "After debating a location for my Megasquirt (for far too long) I went forward with getting the thing mounted. I wanted a location that was both safe and easily accessible. So I sacrificed the glovebox... which wasn't really much of a sacrifice as I'm an anal clean freak I never really kept anything in the car (making an unused glovebox the perfect real estate). Saturday I pulled the box out of the dash for modification and mocked up the routing of my DIYAutoTune pre-made harness. The plug end now resides inside the glovebox while the wiring snakes its way up and over the dash which tucks everything away nicely. Alterations to the glovebox were a 3" x 1/2" hole (which I spent way too much time making) for the plug and four holes for mounting hardware. The glovebox had seen normal wear and tear with previous owners so I even went ahead and felt-lined the base to cover the scrapes and scratches. I mounted the MS2 in the glovebox with some stainless steel allen-head hardware; the rear two took some patience as there was very little room to get my hands/tools back there."

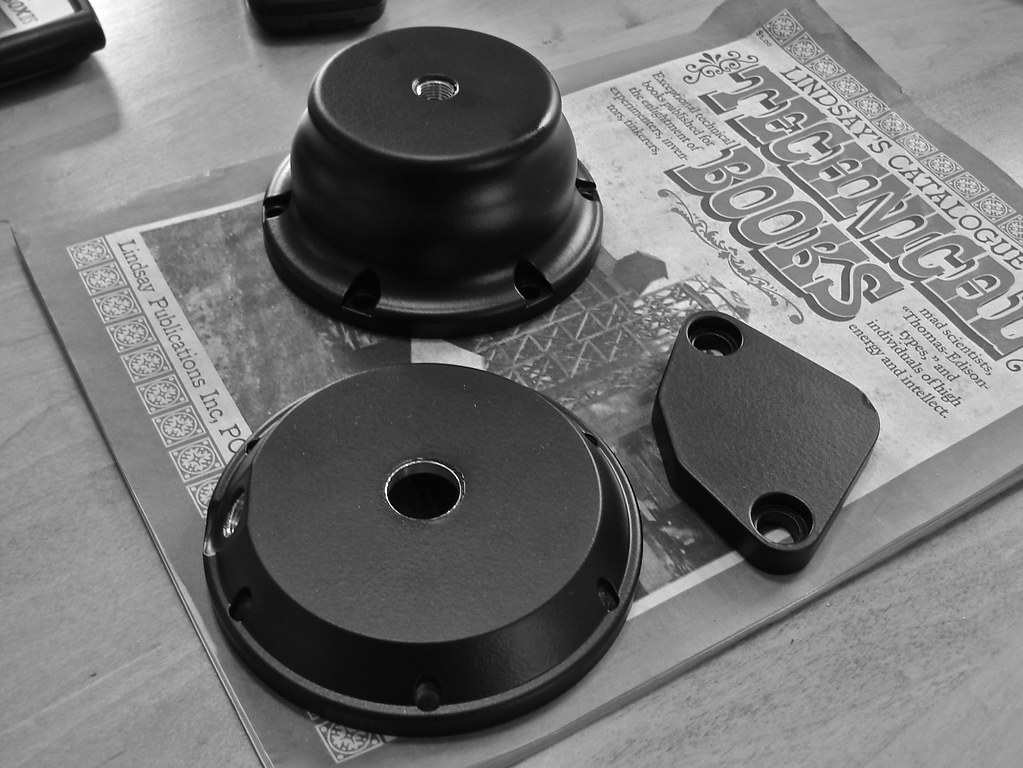
Random Powdercoating, March 24th, 2010: "Purchasing my Black Edition HKS BOV set off a theme of flat black items throughout this build so I knew I wanted to finish my Tial 38mm to match. So last week I dropped off my wastegate and EGR block-off plate at 'Powdercoating Alternatives' and got a call to pick them up today. For the first time in my experience with them I am mildly disappointed. The finish came out lumpy and the prep work on the wastegate became questionable when I discovered some chipping. For the moment I reassembled the wastegate and did some touch-up where it was needed. It looks pretty good but it isn't perfect (nor does it match the HKS 100%). I am torn over bringing these items back to be redone. Right now it is a time thing. I have plenty of down time to have things redone but I want/need to get this bitch running; the more I have attached to the car the less that I have on my mind..."

No comments:
Post a Comment