
This is another long-term project that is finally coming to a close. Once again I've gone overboard for a stock motor build, but I couldn't help myself.

This project started as another "might as well" moment. I knew at the very least I wanted an aluminum cam cover with the full "Twin Cam 16V Saturn" script that was found on the '95 DOHC's for that year only ('94 and early only said "Saturn" while '96 saw the introduction of composite cam covers). Years ago a local Sixthsphere member turned one up for me, only to sit around in the trunk of the car while I tackled other portions of the build. With the intention of getting the car to run this year, I finally unearthed it. By this point I had it in my mind that I was going to build a vented cam cover. I poured over various applications (namely Honda B-series and Mitsubishi 4G63's) for ideas to determine an adequate size and placement of a pair of male AN fittings before choosing -10AN. For some time after I continued to toy with various locations for my fittings until I settled on mimicking the two other vented S-Series cam covers that I knew of - already proven to work right?
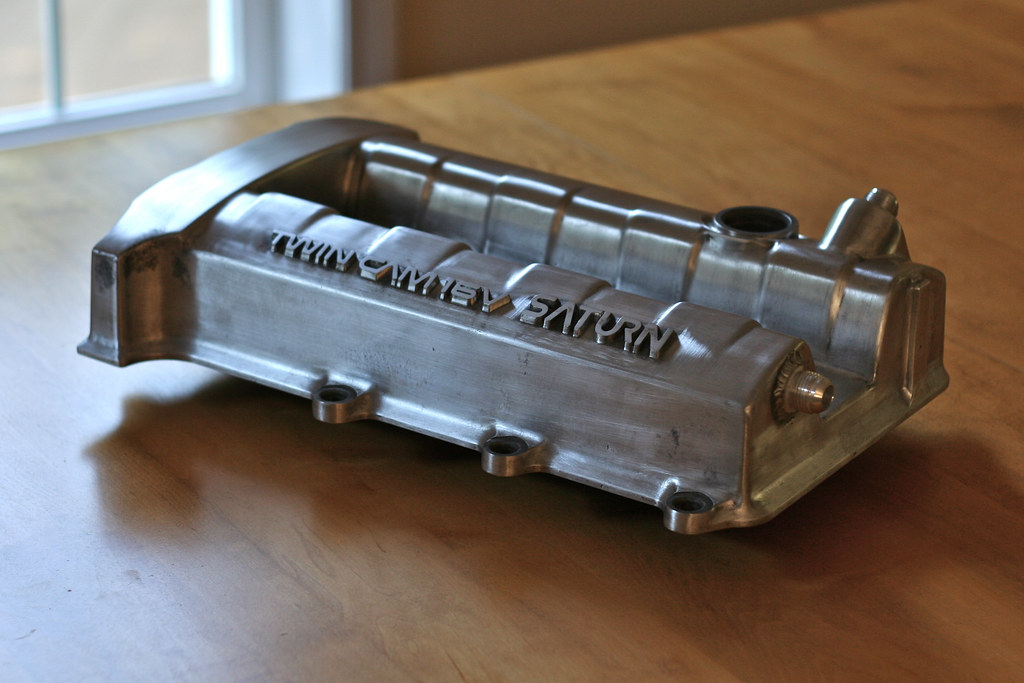
To modify the cam cover, removal of the stamped steel baffles was the first order of business. These baffles were only retained by aluminum stems that had been mushroomed over at the factory, which I center-punched and drilled out. With the baffles out of the way I leveled the outer edge of the cast internal baffling with a 120 grit sanding disc that was just narrow enough to fit. My earlier drilling doubled as center points for new holes that would be drilled and tapped for 1/4-20 stainless-steel button-head screws (I originally started with a smaller size but the heads weren't wide enough to hold down the steel baffles). I set about a thorough degreasing of the underside of the cam cover prior to making my holes for the AN fittings. This involved several hours of letting the cover soak with Simple Green, wiping up what I could, then reapplication. Once enough of the heavy stuff was out the way, I set about a final scrub with more Simple Green, a Scotch Brite pad, and a narrow nylon brush. Whatever motor this cam cover had come off mustn't had seen regular oil changes because this stuff was caked on thick! The first of the two -10AN fittings would seat by simply enlarging the PCV grommet hole. The hole for other fitting, destined for the drivers face of the cam cover, I might have made a little more involved for myself.

Near where I wanted this fitting to go, the factory had already included a pressed-in 3/8" steel vent tube. I concluded was a little too far up and to the right (in hindsight I could have machined the fitting down, but I wasn't thinking at the time). An appropriately sized hole saw made a new hole where I wanted, though it slightly overlapped the old hole. This old hole was eventually filled by welding in a piece of 3/8" aluminum rod, then ground flush with the circumference of the new hole. Finally the -10AN fitting was finally welded into place. My chosen location for this fitting also required that I make a small baffle to weld over the backside. Once everything was dry fitted to my satisfaction I drove the cam cover down to Ballistic Motorsports, where it was chemically stripped before getting TIG welded together. Upon return I got on with some finish work to clean up casting flash around the edges, knock down the course cast surface (120 grit followed by 220 grit), and smooth all of the contours. Presently the finish work is about as far as I think I can take it, and I should be committed to a final finish before the week is out. When I get it back my decision will be unveiled!
This project started as another "might as well" moment. I knew at the very least I wanted an aluminum cam cover with the full "Twin Cam 16V Saturn" script that was found on the '95 DOHC's for that year only ('94 and early only said "Saturn" while '96 saw the introduction of composite cam covers). Years ago a local Sixthsphere member turned one up for me, only to sit around in the trunk of the car while I tackled other portions of the build. With the intention of getting the car to run this year, I finally unearthed it. By this point I had it in my mind that I was going to build a vented cam cover. I poured over various applications (namely Honda B-series and Mitsubishi 4G63's) for ideas to determine an adequate size and placement of a pair of male AN fittings before choosing -10AN. For some time after I continued to toy with various locations for my fittings until I settled on mimicking the two other vented S-Series cam covers that I knew of - already proven to work right?
To modify the cam cover, removal of the stamped steel baffles was the first order of business. These baffles were only retained by aluminum stems that had been mushroomed over at the factory, which I center-punched and drilled out. With the baffles out of the way I leveled the outer edge of the cast internal baffling with a 120 grit sanding disc that was just narrow enough to fit. My earlier drilling doubled as center points for new holes that would be drilled and tapped for 1/4-20 stainless-steel button-head screws (I originally started with a smaller size but the heads weren't wide enough to hold down the steel baffles). I set about a thorough degreasing of the underside of the cam cover prior to making my holes for the AN fittings. This involved several hours of letting the cover soak with Simple Green, wiping up what I could, then reapplication. Once enough of the heavy stuff was out the way, I set about a final scrub with more Simple Green, a Scotch Brite pad, and a narrow nylon brush. Whatever motor this cam cover had come off mustn't had seen regular oil changes because this stuff was caked on thick! The first of the two -10AN fittings would seat by simply enlarging the PCV grommet hole. The hole for other fitting, destined for the drivers face of the cam cover, I might have made a little more involved for myself.
Near where I wanted this fitting to go, the factory had already included a pressed-in 3/8" steel vent tube. I concluded was a little too far up and to the right (in hindsight I could have machined the fitting down, but I wasn't thinking at the time). An appropriately sized hole saw made a new hole where I wanted, though it slightly overlapped the old hole. This old hole was eventually filled by welding in a piece of 3/8" aluminum rod, then ground flush with the circumference of the new hole. Finally the -10AN fitting was finally welded into place. My chosen location for this fitting also required that I make a small baffle to weld over the backside. Once everything was dry fitted to my satisfaction I drove the cam cover down to Ballistic Motorsports, where it was chemically stripped before getting TIG welded together. Upon return I got on with some finish work to clean up casting flash around the edges, knock down the course cast surface (120 grit followed by 220 grit), and smooth all of the contours. Presently the finish work is about as far as I think I can take it, and I should be committed to a final finish before the week is out. When I get it back my decision will be unveiled!
No comments:
Post a Comment